Abyss Chaser: Difference between revisions
| Line 214: | Line 214: | ||
== 2nd Job Skills == | == 2nd Job Skills == | ||
{| class="wikitable" style="border-collapse: collapse; width: 100%; background-color: rgb(251, 238, 184);" | {| class="wikitable" style="border-collapse: collapse; width: 100%; background-color: rgb(251, 238, 184);" | ||
|- | |- | ||
| style="width: 100%;" | | | style="width: 100%;" | | ||
{| class="wikitable" style="border-collapse: collapse; width: 100%; height: 24px;" | {| class="wikitable" style="border-collapse: collapse; width: 100%; height: 24px;" | ||
|- style="height: 24px;" | |- style="height: 24px;" | ||
| style="width: 25%; height: 24px;" | [[File:Vultureeye1.png|300px|frameless]] '''(MT) Vulture's Eye''' | | style="width: 25%; height: 24px;" | [[File:Vultureeye1.png|300px|frameless]] '''(MT) Vulture's Eye''' | ||
| Line 223: | Line 223: | ||
| style="width: 50%; height: 24px;" | '''Passive''' | | style="width: 50%; height: 24px;" | '''Passive''' | ||
|} | |} | ||
|- | |- | ||
| style="width: 100%;" | | | style="width: 100%;" | | ||
{| class="wikitable" style="border-collapse: collapse; width: 100%;" | {| class="wikitable" style="border-collapse: collapse; width: 100%;" | ||
|- | |- | ||
| style="width: 100%;" | - | | style="width: 100%;" | - | ||
|} | |} | ||
|} | |} | ||
{| class="wikitable" style="border-collapse: collapse; width: 100%; height: 83px; background-color: rgb(248, 202, 198);" | {| class="wikitable" style="border-collapse: collapse; width: 100%; height: 83px; background-color: rgb(248, 202, 198);" | ||
|- style="height: 60px;" | |- style="height: 60px;" | ||
| style="width: 100%; height: 60px;" | | | style="width: 100%; height: 60px;" | | ||
{| class="wikitable" style="border-collapse: collapse; width: 100%; height: 24px;" | {| class="wikitable" style="border-collapse: collapse; width: 100%; height: 24px;" | ||
|- style="height: 24px;" | |- style="height: 24px;" | ||
| style="width: 25%; height: 24px;" | [[File:Doublestrafe2.png|300px|frameless]] '''Double Strafe''' | | style="width: 25%; height: 24px;" | [[File:Doublestrafe2.png|300px|frameless]] '''Double Strafe''' | ||
| Line 241: | Line 241: | ||
|} | |} | ||
|- style="height: 23px;" | |- style="height: 23px;" | ||
| style="width: 100%; height: 23px;" | | | style="width: 100%; height: 23px;" | | ||
{| class="wikitable" style="border-collapse: collapse; width: 100%;" | {| class="wikitable" style="border-collapse: collapse; width: 100%;" | ||
|- | |- | ||
| style="width: 100%;" | - | | style="width: 100%;" | - | ||
|} | |} | ||
|} | |} | ||
{| class="wikitable" style="border-collapse: collapse; width: 100%; height: 83px; background-color: rgb(194, 224, 244);" | {| class="wikitable" style="border-collapse: collapse; width: 100%; height: 83px; background-color: rgb(194, 224, 244);" | ||
|- style="height: 60px;" | |- style="height: 60px;" | ||
| style="width: 100%; height: 60px;" | | | style="width: 100%; height: 60px;" | | ||
{| class="wikitable" style="border-collapse: collapse; width: 100%;" | {| class="wikitable" style="border-collapse: collapse; width: 100%;" | ||
|- | |- | ||
| style="width: 25%;" | [[File:Removetrap2.png|300px|frameless]] '''Remove Trap''' | | style="width: 25%;" | [[File:Removetrap2.png|300px|frameless]] '''Remove Trap''' | ||
| style="width: 25%;" | '''Max Level 1''' | | style="width: 25%;" | '''Max Level 1''' | ||
| Line 258: | Line 258: | ||
|} | |} | ||
|- style="height: 23px;" | |- style="height: 23px;" | ||
| style="width: 100%; height: 23px;" | | | style="width: 100%; height: 23px;" | | ||
{| class="wikitable" style="border-collapse: collapse; width: 100%;" | |||
|- | |||
| style="width: 100%;" | - | |||
|} | |||
|} | |||
{| class="wikitable" style="border-collapse: collapse; width: 100%; background-color: rgb(251, 238, 184);" | |||
|- | |||
| style="width: 100%;" | | |||
{| class="wikitable" style="border-collapse: collapse; width: 100%;" | |||
|- | |||
| style="width: 25%;" | [[File:Tunneldrive.png|300px|frameless]] '''Tunnel Drive''' | |||
| style="width: 25%;" | '''Max Level 5''' | |||
| style="width: 50%;" | '''Passive''' | |||
|} | |||
|- | |||
| style="width: 100%;" | | |||
{| class="wikitable" style="border-collapse: collapse; width: 100%;" | |||
|- | |||
| style="width: 100%;" | - | |||
|} | |||
|} | |||
{| class="wikitable" style="border-collapse: collapse; width: 100%; background-color: rgb(251, 238, 184);" | |||
|- | |||
| style="width: 100%;" | | |||
{| class="wikitable" style="border-collapse: collapse; width: 100%;" | |||
|- | |||
| style="width: 25%;" | [[File:Snatcher.png|300px|frameless]] '''Snatcher''' | |||
| style="width: 25%;" | '''Max Level 10''' | |||
| style="width: 50%;" | '''Passive''' | |||
|} | |||
|- | |||
| style="width: 100%;" | | |||
{| class="wikitable" style="border-collapse: collapse; width: 100%;" | |||
|- | |||
| style="width: 100%;" | - | |||
|} | |||
|} | |||
{| class="wikitable" style="border-collapse: collapse; width: 100%; height: 46px; background-color: rgb(194, 224, 244);" | |||
|- style="height: 23px;" | |||
| style="width: 100%; height: 23px;" | | |||
{| class="wikitable" style="border-collapse: collapse; width: 100%;" | |||
|- | |||
| style="width: 25%;" | [[File:Stealcoin.png|300px|frameless]] '''Steal Coin''' | |||
| style="width: 25%;" | '''Max Level 10''' | |||
| style="width: 25%;" | '''Active''' | |||
| style="width: 25%;" | '''Supportive''' | |||
|} | |||
|- style="height: 23px;" | |||
| style="width: 100%; height: 23px;" | | |||
{| class="wikitable" style="border-collapse: collapse; width: 100%;" | |||
|- | |||
| style="width: 100%;" | - | |||
|} | |||
|} | |||
{| class="wikitable" style="border-collapse: collapse; width: 100%; background-color: rgb(248, 202, 198);" | |||
|- | |||
| style="width: 100%;" | | |||
{| class="wikitable" style="border-collapse: collapse; width: 100%;" | |||
|- | |||
| style="width: 25%;" | [[File:Backstab.png|300px|frameless]] '''Back Stab''' | |||
| style="width: 25%;" | '''Max Level 10''' | |||
| style="width: 25%;" | '''Active''' | |||
| style="width: 25%;" | '''Physical Melee''' | |||
|} | |||
|- | |||
| style="width: 100%;" | | |||
{| class="wikitable" style="border-collapse: collapse; width: 100%;" | |||
|- | |||
| style="width: 100%;" | - | |||
|} | |||
|} | |||
{| class="wikitable" style="border-collapse: collapse; width: 100%; background-color: rgb(248, 202, 198);" | |||
|- | |||
| style="width: 100%;" | | |||
{| class="wikitable" style="border-collapse: collapse; width: 100%;" | |||
|- | |||
| style="width: 25%;" | [[File:Raid.png|300px|frameless]] '''Raid''' | |||
| style="width: 25%;" | '''Max Level 5''' | |||
| style="width: 25%;" | '''Active''' | |||
| style="width: 25%;" | '''Physical Melee''' | |||
|} | |||
|- | |||
| style="width: 100%;" | | |||
{| class="wikitable" style="border-collapse: collapse; width: 100%;" | |||
|- | |||
| style="width: 100%;" | - | |||
|} | |||
|} | |||
{| class="wikitable" style="border-collapse: collapse; width: 100%; background-color: rgb(248, 202, 198);" | |||
|- | |||
| style="width: 100%;" | | |||
{| class="wikitable" style="border-collapse: collapse; width: 100%;" | |||
|- | |||
| style="width: 25%;" | [[File:Intimidate.png|300px|frameless]] '''Intimidate''' | |||
| style="width: 25%;" | '''Max Level 5''' | |||
| style="width: 25%;" | '''Active''' | |||
| style="width: 25%;" | '''Physical Melee''' | |||
|} | |||
|- | |||
| style="width: 100%;" | | |||
{| class="wikitable" style="border-collapse: collapse; width: 100%;" | {| class="wikitable" style="border-collapse: collapse; width: 100%;" | ||
|- | |- | ||
| Line 269: | Line 369: | ||
{| class="wikitable" style="border-collapse: collapse; width: 100%;" | {| class="wikitable" style="border-collapse: collapse; width: 100%;" | ||
|- | |- | ||
| style="width: 25%;" | [[File: | | style="width: 25%;" | [[File:Plagiarism.png|300px|frameless]] '''Plagiarism''' | ||
| style="width: 25%;" | '''Max Level | | style="width: 25%;" | '''Max Level 10''' | ||
| style="width: 50%;" | '''Passive''' | | style="width: 50%;" | '''Passive''' | ||
|} | |} | ||
| Line 280: | Line 380: | ||
|} | |} | ||
|} | |} | ||
{| class="wikitable" style="border-collapse: collapse; width: 100%; background-color: rgb( | {| class="wikitable" style="border-collapse: collapse; width: 100%; background-color: rgb(236, 202, 250);" | ||
|- | |- | ||
| style="width: 100%;" | | | style="width: 100%;" | | ||
{| class="wikitable" style="border-collapse: collapse; width: 100%;" | {| class="wikitable" style="border-collapse: collapse; width: 100%;" | ||
|- | |- | ||
| style="width: 25%;" | [[File: | | style="width: 25%;" | [[File:Striphelm.png|300px|frameless]] '''Strip Helm''' | ||
| style="width: 25%;" | '''Max Level | | style="width: 25%;" | '''Max Level 5''' | ||
| style="width: | | style="width: 25%;" | '''Active''' | ||
| style="width: 25%;" | '''Debuff''' | |||
|} | |} | ||
|- | |- | ||
| Line 296: | Line 397: | ||
|} | |} | ||
|} | |} | ||
{| class="wikitable" style="border-collapse: collapse; width: 100%; height: 46px; background-color: rgb( | {| class="wikitable" style="border-collapse: collapse; width: 100%; height: 46px; background-color: rgb(236, 202, 250);" | ||
|- style="height: 23px;" | |- style="height: 23px;" | ||
| style="width: 100%; height: 23px;" | | | style="width: 100%; height: 23px;" | | ||
{| class="wikitable" style="border-collapse: collapse; width: 100%;" | {| class="wikitable" style="border-collapse: collapse; width: 100%;" | ||
|- | |- | ||
| style="width: 25%;" | [[File: | | style="width: 25%;" | [[File:Strishield.png|300px|frameless]] '''Strip Shield''' | ||
| style="width: 25%;" | '''Max Level | | style="width: 25%;" | '''Max Level 5''' | ||
| style="width: 25%;" | '''Active''' | | style="width: 25%;" | '''Active''' | ||
| style="width: 25%;" | ''' | | style="width: 25%;" | '''Debuff''' | ||
|} | |} | ||
|- style="height: 23px;" | |- style="height: 23px;" | ||
| Line 313: | Line 414: | ||
|} | |} | ||
|} | |} | ||
{| class="wikitable" style="border-collapse: collapse; width: 100%; background-color: rgb( | {| class="wikitable" style="border-collapse: collapse; width: 100%; background-color: rgb(236, 202, 250);" | ||
|- | |- | ||
| style="width: 100%;" | | | style="width: 100%;" | | ||
{| class="wikitable" style="border-collapse: collapse; width: 100%;" | {| class="wikitable" style="border-collapse: collapse; width: 100%;" | ||
|- | |- | ||
| style="width: 25%;" | [[File: | | style="width: 25%;" | [[File:Striparmo.png|300px|frameless]] '''Strip Armor''' | ||
| style="width: 25%;" | '''Max Level | | style="width: 25%;" | '''Max Level 5''' | ||
| style="width: 25%;" | '''Active''' | | style="width: 25%;" | '''Active''' | ||
| style="width: 25%;" | ''' | | style="width: 25%;" | '''Debuff''' | ||
|} | |} | ||
|- | |- | ||
| Line 330: | Line 431: | ||
|} | |} | ||
|} | |} | ||
{| class="wikitable" style="border-collapse: collapse; width: 100%; background-color: rgb( | {| class="wikitable" style="border-collapse: collapse; width: 100%; background-color: rgb(236, 202, 250);" | ||
|- | |- | ||
| style="width: 100%;" | | | style="width: 100%;" | | ||
{| class="wikitable" style="border-collapse: collapse; width: 100%;" | {| class="wikitable" style="border-collapse: collapse; width: 100%;" | ||
|- | |- | ||
| style="width: 25%;" | [[File: | | style="width: 25%;" | [[File:Stripweapon.png|300px|frameless]] '''Strip Weapon''' | ||
| style="width: 25%;" | '''Max Level 5''' | | style="width: 25%;" | '''Max Level 5''' | ||
| style="width: 25%;" | '''Active''' | | style="width: 25%;" | '''Active''' | ||
| style="width: 25%;" | ''' | | style="width: 25%;" | '''Debuff''' | ||
|} | |||
|- | |||
| style="width: 100%;" | | |||
{| class="wikitable" style="border-collapse: collapse; width: 100%;" | |||
|- | |||
| style="width: 100%;" | - | |||
|} | |||
|} | |||
{| class="wikitable" style="border-collapse: collapse; width: 100%; background-color: rgb(251, 238, 184);" | |||
|- | |||
| style="width: 100%;" | | |||
{| class="wikitable" style="border-collapse: collapse; width: 100%;" | |||
|- | |||
| style="width: 25%;" | [[File:Swordmastery1.png|300px|frameless]] '''Sword Mastery''' | |||
| style="width: 25%;" | '''Max Level 10''' | |||
| style="width: 50%;" | '''Passive''' | |||
|} | |||
|- | |||
| style="width: 100%;" | | |||
{| class="wikitable" style="border-collapse: collapse; width: 100%;" | |||
|- | |||
| style="width: 100%;" | - | |||
|} | |||
|} | |||
{| class="wikitable" style="border-collapse: collapse; width: 100%; background-color: rgb(251, 238, 184); height: 83px;" | |||
|- style="height: 60px;" | |||
| style="width: 100%; height: 60px;" | | |||
{| class="wikitable" style="border-collapse: collapse; width: 100%;" | |||
|- | |||
| style="width: 25%;" | [[File:Gangster.png|300px|frameless]] '''Gangster Paradise''' | |||
| style="width: 25%;" | '''Max Level 1''' | |||
| style="width: 50%;" | '''Passive''' | |||
|} | |||
|- style="height: 23px;" | |||
| style="width: 100%; height: 23px;" | | |||
{| class="wikitable" style="border-collapse: collapse; width: 100%;" | |||
|- | |||
| style="width: 100%;" | - | |||
|} | |||
|} | |||
{| class="wikitable" style="border-collapse: collapse; width: 100%; background-color: rgb(194, 224, 244);" | |||
|- | |||
| style="width: 100%;" | | |||
{| class="wikitable" style="border-collapse: collapse; width: 100%; height: 24px;" | |||
|- style="height: 24px;" | |||
| style="width: 25%; height: 24px;" | [[File:Cleaner.png|300px|frameless]] '''Cleaner''' | |||
| style="width: 25%; height: 24px;" | '''Max Level 1''' | |||
| style="width: 25%; height: 24px;" | '''Active''' | |||
| style="width: 25%; height: 24px;" | '''Supportive''' | |||
|} | |||
|- | |||
| style="width: 100%;" | | |||
{| class="wikitable" style="border-collapse: collapse; width: 100%;" | |||
|- | |||
| style="width: 100%;" | - | |||
|} | |||
|} | |||
{| class="wikitable" style="border-collapse: collapse; width: 100%; background-color: rgb(194, 224, 244);" | |||
|- | |||
| style="width: 100%;" | | |||
{| class="wikitable" style="border-collapse: collapse; width: 100%; height: 24px;" | |||
|- style="height: 24px;" | |||
| style="width: 25%; height: 24px;" | [[File:Flaggraffiti.png|300px|frameless]] '''Flag Graffiti''' | |||
| style="width: 25%; height: 24px;" | '''Max Level 5''' | |||
| style="width: 25%; height: 24px;" | '''Active''' | |||
| style="width: 25%; height: 24px;" | '''Supportive''' | |||
|} | |||
|- | |||
| style="width: 100%;" | | |||
{| class="wikitable" style="border-collapse: collapse; width: 100%;" | |||
|- | |||
| style="width: 100%;" | - | |||
|} | |||
|} | |||
{| class="wikitable" style="border-collapse: collapse; width: 100%; background-color: rgb(194, 224, 244);" | |||
|- | |||
| style="width: 100%;" | | |||
{| class="wikitable" style="border-collapse: collapse; width: 100%;" | |||
|- | |||
| style="width: 25%;" | [[File:Grafitti.png|300px|frameless]] '''Graffiti''' | |||
| style="width: 25%;" | '''Max Level 1''' | |||
| style="width: 25%;" | '''Active''' | |||
| style="width: 25%;" | '''Supportive''' | |||
|} | |||
|- | |||
| style="width: 100%;" | | |||
{| class="wikitable" style="border-collapse: collapse; width: 100%;" | |||
|- | |||
| style="width: 100%;" | - | |||
|} | |||
|} | |||
{| class="wikitable" style="border-collapse: collapse; width: 100%; background-color: rgb(251, 238, 184);" | |||
|- | |||
| style="width: 100%;" | | |||
{| class="wikitable" style="border-collapse: collapse; width: 100%;" | |||
|- | |||
| style="width: 25%;" | [[File:Compulsion.png|300px|frameless]] '''Compulsion Discount''' | |||
| style="width: 25%;" | '''Max Level 5''' | |||
| style="width: 50%;" | '''Passive''' | |||
|} | |} | ||
|- | |- | ||
| style="width: 100%;" | | | style="width: 100%;" | | ||
{| class="wikitable" style="border-collapse: collapse; width: 100%;" | |||
|- | |||
| style="width: 100%;" | - | |||
|} | |||
|} | |||
{| class="wikitable" style="border-collapse: collapse; width: 100%; background-color: rgb(236, 202, 250); height: 119px;" | |||
|- style="height: 60px;" | |||
| style="width: 100%; height: 60px;" | | |||
{| class="wikitable" style="border-collapse: collapse; width: 100%; height: 24px;" | |||
|- style="height: 24px;" | |||
| style="width: 25%; height: 24px;" | [[File:Closecofine.png|300px|frameless]] '''Close Confine''' | |||
| style="width: 25%; height: 24px;" | '''Quest Skill (Learned from NPC)''' | |||
| style="width: 25%; height: 24px;" | '''Active''' | |||
| style="width: 25%; height: 24px;" | '''Debuff''' | |||
|} | |||
|- style="height: 59px;" | |||
| style="width: 100%; height: 59px;" | | |||
{| class="wikitable" style="border-collapse: collapse; width: 100%;" | {| class="wikitable" style="border-collapse: collapse; width: 100%;" | ||
|- | |- | ||
Revision as of 02:03, 23 May 2026
Intro
| Novice | Thief
(1st Job) |
Rogue
(2nd Job) |
Stalker
(2nd Job Transcedent) |
Shadow Chaser
(3rd Job) |
Abyss Chaser
(4th Job) |

|

|

|

|

|
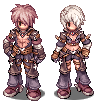
|
|
Description |
Max Level HP/SP | Stats Bonus when Max Job Level |
|
- |
|
Str+8, Agi+9, Vit+8, Int+6, Dex+6, Luk+6 Pow+9, Sta+8, Wis+4, Spl+8, Con+5, Ctr+6 |
1st Job Skills
| |||
|

| |||
|

| ||||
|

| ||||
|

| ||||
|

| ||||
|

| ||||
|

| ||||
|

| ||||
|

| ||||
|

2nd Job Skills
| |||
|

| ||||
|

| ||||
|

| |||
|

| |||
|

| ||||
|

| ||||
|

| ||||
|

| ||||
|

| |||
|

| ||||
|

| ||||
|

| ||||
|

| ||||
|

| |||
|

| |||
|

| ||||
|

| ||||
|

| ||||
|

| |||
|

| ||||
|

2nd Job Transcendent Skills
3rd Job Skills
4th Job Skills
| |||
|

| ||||
| ||||


| ||||
|


| ||||
| ||||
|


| ||||
| ||||


| ||||
|


| ||||
|


| ||||
|


| ||||
| ||||


| ||||
| ||||


| |||
|

| ||||
| ||||
|


| ||||
|


| ||||
| ||||


| ||||
|


Related NPC
|
Job Change |
N/A |
Given |
|
Supply Dealer Department Store in main town |

|
|
|
Magician Steven Department Store in main town |

|
 Red Gemstone Red Gemstone
|
|
Plagiarism NPC Training Ground |

|
Copy skills available for Intimidate and Reproduce. |


